Windows 10: Deployment and management lab kit

Windows-10-Banner

I’m currently updating my Microsoft certifications with the exam 70-697 Configuring Windows Devices and have done a lot of hands on lab training recently.

I’ve downloaded the whopping 30Gb Windows 10 deployment and management lab kit for my testlab and felt it was a great resource that should be shared.

In addition to a pre-configured Hyper-V lab environment containing full domain, SCCM, MDT, MBAM etc. It comes with a good series of lab guides to work through.

Here’s a table of the servers and roles it creates for you.

Server Name Roles & Products
HYD-DC1 Active Directory Domain Controller, DNS, DHCP, Certificate Services
HYD-MDT1 Microsoft Deployment Toolkit 2013 Update 2
Windows 10 1607 ADK
Windows Deployment Services
HYD-CM1 System Center Configuration Manager 1511
Windows Deployment Services
Microsoft Deployment Toolkit 2013 Update 2
Windows 10 1607 ADK
Windows Software Update Services
Microsoft SQL Server 2014
HYD-APP1 Microsoft BitLocker Administration and Monitoring
Microsoft SQL Server 2014
HYD-GW1 Remote Access for Internet Connectivity
HYD-MASTER Blank VM for building a reference image
HYD-TEST Blank VM for LTI deployment of a reference image and other activities
HYD-DEPLOY Blank VM for ZTI deployment of a reference image and other activities

So basically, its a hydration kit that builds quicker with lab guides so you can have virtual labs but without the time limit.

In my lab, the kit built 8 virtual machines. 5 running and 3 for deployment testing. It’s currently not using more than 8Gb with dynamic memory with the default 5 vms.

testlab-hyperv

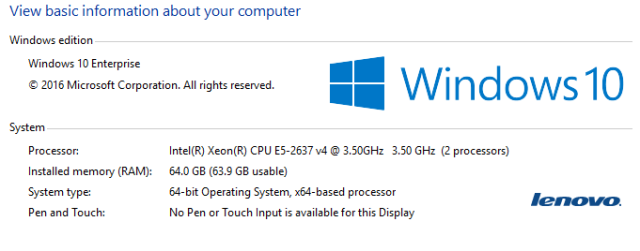
In terms of what is needed to run this. I’m using a Lenovo ThinkStation P710 workstation class machine with 64Gb ram and a Xeon E5 but I’m pretty sure that this would easily run on my HP Microserver with 16Gb RAM.

testlab-specGet it here.


Posted in Certified Training, Deployment, MDT 2013, SCCM, Testlab, Windows 10 | Tagged , , , , | Leave a comment

Windows 10: Unable to open PDF from file share in Microsoft Edge

Windows-10-Banner

I’ve been working on a Windows 10 1511 defect where the devices are unable to open some PDF files from a fully qualified domain name (FQDN) mapped drive such as a DFS using Microsoft Edge browser.

Users receive this message in Edge when they try to launch a PDF from a FQDN mapped drive:

Hmm, we can’t reach this page.
Try this
Make sure that you’ve got the right web address. . .

Hmm we cant reach this page error

I’m showing how to create the issue with a workaround I found. I’m going to link this post to this issue on Edges Developer site. Please click there and vote if you have seen the same issue.

There are a number of workarounds for this such as:

  • Copy the PDF file locally and launch it.
  • Map a drive using single label resolution (example: \\server\share).
  • Connect to the share directly using UNC with single label resolution (example: \\server\share).

How to replicate the issue in a lab

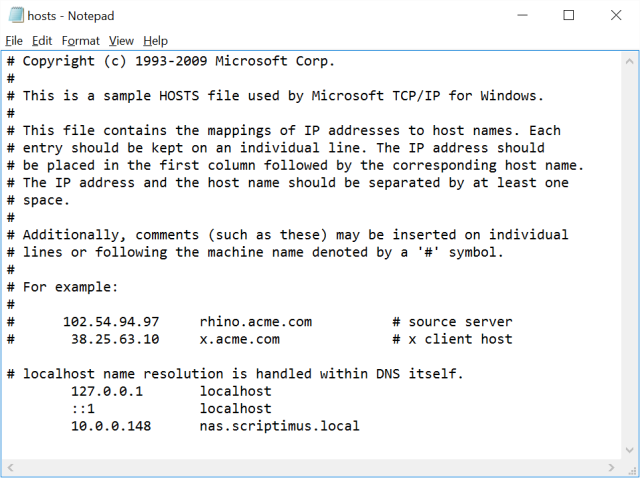
In order to emulate the issue I had in the enterprise, I modified to local hosts file (C:\Windows\System32\drivers\etc\hosts) in my home network to make my home NAS act similar to a DFS namespace using a FQDN source.

Open Host file

I added a new line to the hosts file which had the local IP address of my NAS and a made up FQDN for testing. In this case it was nas.scriptimus.local.


Edit Host file

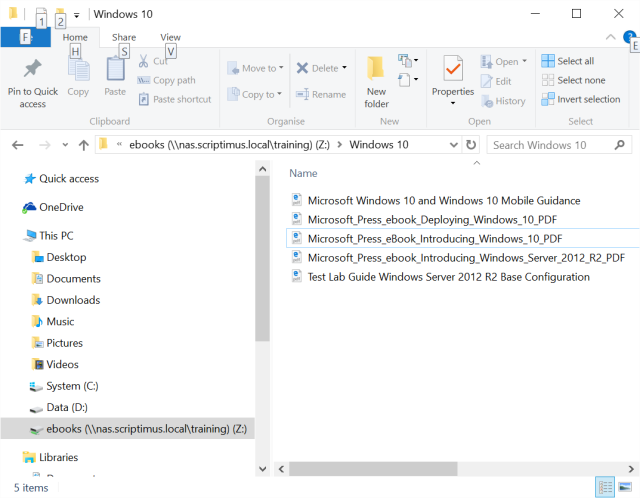
I then mapped a drive to the NAS share where I already had a number of PDF ebooks.

Try to open a PDF

When I tried to access any of these files I received a prompt similar to this.

Hmm we cant reach this page error

So what’s the issue?

Well this shouldn’t happen. For one thing, Edge will open the same files using other methods. For example:

  • If I copy the files locally the files open in Edge.
  • If I map a drive using just the hostname the files open in Edge.
  • If I UNC to the share the files open in Edge.

This is the same issue countless people are experiencing in the enterprise. The issue was closed on Microsoft Connect as they were unable to reproduce the issue.

To ‘fix’ this issue

Simply add the DNS name or suffix to the Local Intranet sites in Internet Explorer 11.Add IE 11 Zone

After this you can open your PDF files in Edge without issue.


Opens fine now

I use the term ‘fix’ loosely because you really should not need to do this but as a work around it works for me. If anyone has a better fix then please feel free to comment below.

Posted in Windows 10 | Tagged , | 5 Comments

PowerShell: Temporary Folders

Scriptimus_PowerShell_Banner

I was looking through some old code and came across an alternate way to create a temporary folder using PowerShell(or .NET if you want to be picky).

So, I needed to create a temporary folder and constructed this line of code. It created a temporary folder path that I could use to build files in one of my DSC Testlab projects.

([System.IO.Path]::GetTempPath()+'~'+([System.IO.Path]::GetRandomFileName())).Split('.')[0]

Temp_Folders_1

Here’s how it works. First, I use GetTempPath to return the current temp folder path.

[System.IO.Path]::GetTempPath()

Temp_Folders_2

Then add a tilde ( ‘~’ ) as a prefix as this is a universally recognised method of prefixing a temp file or folder name.

Next I generate a random folder using the GetRandomFileName method.

[System.IO.Path]::GetRandomFileName()

Temp_Folders_3

Now I didn’t need the file extension at the end so I removed it by using the split method to split it into 2 objects returning only the first part.

[System.IO.Path]::GetRandomFileName().Split('.')[0]

Temp_Folders_4

This worked great and I later learned that I could do something similar by using GetTempFileName which would be less code.

[System.IO.Path]::GetTempFileName()

Temp_Folders_5

Sweet! Next do the split trick again to use the string as a folder path.

[System.IO.Path]::GetTempFileName().Split('.')[0]

Temp_Folders_6

The issue with this though is that the GetTempFileName method actually generates a zero byte file and returns the string. This is very useful in some scenarios but not for my task of just creating an empty folder.

Temp_Folders_7

After a bit of research I decided to stay with my first option.


Posted in Scripting, Uncategorized | Tagged , , | 2 Comments

PowerShell: Test-IsAdmin

Scriptimus PowerShell Banner

Sometimes I only want a PowerShell function to run only if the user has local admin rights. This can be tested for by looking for the admin token.

Here’s a function I use.

Function Test-IsAdmin {

 $user = [Security.Principal.WindowsIdentity]::GetCurrent();
 (New-Object Security.Principal.WindowsPrincipal $user).IsInRole([Security.Principal.WindowsBuiltinRole]::Administrator) 
 }

I then call the function in my code using this snippet

 If (!(Test-IsAdmin)) {
 Write-Warning "This script needs admin rights to run!!!"
 $HOST.UI.RawUI.ReadKey("NoEcho,IncludeKeyDown") | OUT-NULL
 $HOST.UI.RawUI.Flushinputbuffer()
 Break
 }

Result!

testisadmin

Technical info on MSDN here.

Remember, for a script or module you could use the #Requires statement but this wont work in a function.

#Requires -RunAsAdministrator 

Enjoy.

Posted in PowerShell | Tagged , , | Leave a comment

Testlab: HP ProLiant MicroServer Gen8 G1610T

Once your training evolves to enterprise level, you’ll need enterprise level hardware to simulate real world test scenarios. Let’s face it, corporate IT training is usually restricted to a privileged few so if you want to get on, get your own kit, get training, get certified, get a new job and get paid!

In September, I upgraded my home TestLab by purchasing a HP ProLiant MicroServer Gen8 G1610T. I was excited then by all the talk about the new Gen 9 servers but also understood that realistically there was not going to be a Gen 9 MicroServer any tine soon.

20150501_170154

Now in May 2015, HP have dropped the price of the G1610T by half and are also offering a a cashback deal. (Perhaps because they’re about to release the Gen9?) So I just bought a second one.

Here’s the spec and cost of my first Gen8 server.

Intel BX80637E31240V2 Xeon Quad-Core Processor 3.4 GHz LGA1155 Socket 8 MB L3 Cache 69 Watt

clip_image001

£201.30

2 of Samsung 840 EVO 250GB 2.5 inch Basic SATA Solid State Drive

clip_image002

£79.99

Kingston Technology KVR1333D3E9SK2/16G – Kingston ValueRAM 16GB (2x8GB) Memory Kit 1333MHz DDR3 ECC 240-pin Unbuffered DIMM

clip_image003

£144.09

HP G1610T 150W PS ProLiant Gen8 Micro Server

clip_image004

£335.10

This spec

For the new server, this time I only bought memory and decided to use existing hard drives and try the Celeron CPU out to see how far I get with it before I run into issues. I’ll post back with my judgement on the Celeron CPU running a basic lab at some point.

Here’s  the spec

HP ProLiant Gen8 G1610T MicroServer

clip_image001[2]

£179.99
£119.99 after cashback
Kingston 16GB 1333MHz DDR3 ECC CL9 DIMM (Kit of 2)

clip_image002[2]

£123.66

In my opinion, for a Windows Server 2012 R2 Hyper-V TestLab, I wouldn’t recommend purchasing this unless you get a bargain. For one thing, it has BIOS not UEFI so it will not run Generation 2 VM’s. I’m not saying don’t buy it(I think it’s a really great server), I’d just consider more up to date hardware.

It was my plan to buy one of the new NUC boxes but I’m just waiting for Samsung to release their super fast M.2 NVMe SSD.

Anyway, I upgraded the memory before first boot without any issues. Just pop off the lid and remove the old stick.

20150501_172307

The memory is detected and tested auto’magic’ly on the first boot.

20150501_174030

I had this great plan of booting VMware from MicroSD so ran out and bought these 2 bad boys after checking the official guidelines from HP.

20150501_151512

It didn’t work and I’m currently at a loss to understand why the card was not recognized so further research is in order. There’s a post of people having similar issues here.

20150501_173007

I had to open the case again to get the card back out which is something which could be improved upon in the next gen. I suppose in the meantime I could boot from USB(Done that. Sigh!).

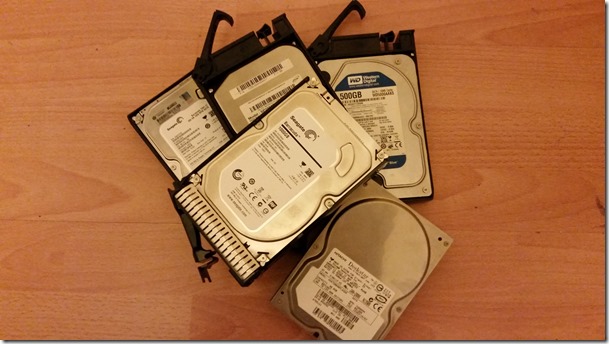
Next I had the bright idea of using some of the crappy old drives I had lying around. I decided to use one of my 250Gb SATA drives as a boot drive and use the others in a pool.

20150502_221506

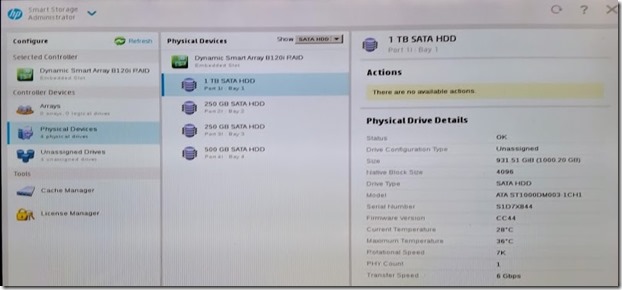
Windows Server 2012 R2 installed OK using Intelligent Provisioning but when I tried tab completion in PowerShell for the first time the system took 10 minutes to complete that task. I had a similar delay when I tried to open Disk Manager. Then I had the idea of putting all the drives in at once and using the Smart Storage Administrator (It’s in Intelligent Provisioning)tool to examine the drives.

20150502_170452

After reviewing the hard drives, I decided to remove all the SATA 2 drives and just stick with the SATA 3 1TB drive. After rebuilding Server 2012 R2 again using IP, the tab completion issue and other issues were gone. Lesson learned. I’ll stick the SATA 2 drives back in the old N40 server for my upcoming FreeNAS lab tests.

Finally, here’s the great link to the Home Server Show Forum that really helped me demystify what hardware was compatible.

http://homeservershow.com/forums/index.php?/topic/5639-proliant-microserver-gen8-links/

Posted in Testlab | Tagged , , | 4 Comments

Managing DSC Resources in PowerShell Desired State Configuration (DSC)

image_thumb.png

PowerShell Desired State Configuration (DSC) Resources are an evolved type of function usually created by experienced PowerShell coders. Resources are at the very core of DSC and contain the code required to perform the actual configuration tasks in your deployments.

My first post was how to use DSC. My second post was about what DSC is, this post is more of a where to find and discover resources.

In my previous post, I used a DSC Resource called File and executed it a number of ways to manipulate a text file. You can view its syntax in the console by using the Get-DSCResource cmdlet with the -Syntax switch.

image

Built in Resources

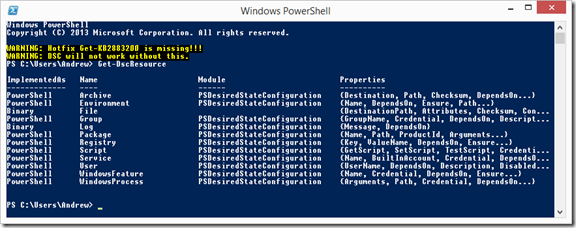
DSC comes with a small number of built-in Resources for configuring files and folders, roles and features, security groups, registry settings, environment variables, and services and processes. You can view these built in resources by typing Get-DSCResource. This screenshot of my laptop, this is an example of what you would see with the default setup.

image

You can find more information on these build-in resources here: Built-In Windows PowerShell Desired State Configuration Resources

Powershell Team Resources

From December 2013 to February 2015 the PowerShell team released a number of DSC Resources called the DSC Resource Kit. These contained a number of PowerShell modules that contained DSC resources and example configurations. They were published to Technet in the PowerShell gallery.

These were great resources but were by no means complete. They were starter modules intended as guidance and working examples to help the community develop their own resources.

Sadly the PowerShell team have stopped publishing the resource kit at wave 10. They are however, still releasing new and updated resources via the PowerShell Gallery and recommend that you use PowerShellGet (in WMF 5.0) to find them.

Microsoft propose naming standards for publicly shared resources. They use the x prefix that stands for ‘experimental’. Microsoft Resources

No refunds!

These resources are offered freely but without any support. If you find any issues etc you can post a request on Microsoft Connect but don’t hold your breath. I posted a request last September that has had no response. Bugs however are answered slightly quicker like this one. DSC: xIPAddress IP detection issue I’ve still not seen a fix though. In the end I just fixed the bug myself and renamed the resource to a comunity resource using the standards Microsoft suggest at the bottom of this page.

Community resources

Speaking of which, you can develop your own resources or download them from the community. I’ll be releasing my own resources shortly in a kit to help automate the building of the Windows Server 2012 R2 Test Lab Guide.

ScriptimusExMachina Resources

Microsoft suggest prefixing your own resources with ‘c’ for community. If you do build your own resource then the PowerShell Team have posted the really helpful PowerShell DSC Resource Design and Testing Checklist on their blog. Thanks guys!

Corporate or private resourses.

You could create your own internal corporate standard. Eg. ‘e’ for enterprise. This would help to indicate that these are private and should not leave your business environment. But then again, that’s your own business.

Installing resources from the internet.

The first thing to do is (after a virus/malware scan) right-click and unblock the archive before accessing it as it came from the internet. If not then the contents will also be still blocked and you’ll have fun unblocking each of the files in turn.

Unblock

As always never put code from the internet into your production environments. Use the online resources as examples to help develop your own code.

Unpack the contents into the folder C:\Program Files\WindowsPowerShell\Modules\

Then use Get-DSCResource to see if you can now access them. If you can still only see the built in resources then it’s likely that you will need to download and install Hotfix KB 2883200 (Windows 8.1 and Windows Server 2012 R2 General Availability Update Rollup)

This is the last of the basic topics that I’ll be posting on DSC.  Next I’ll share the resources that have helped me learn DSC and then I’ll post details of the hurdles and gotcha’s I came across when trying to build my own resource.

Posted in Deployment, Desired State Configuration, DSC, PowerShell | Tagged , , , , | 3 Comments

PowerShell: Inside Desired State Configuration (DSC) – Get,Set and Test

image_thumb.png

Today I’m going to continue explaining the fundamentals of PowerShell Desired State Configuration (DSC). Yesterdays post focused on running DSC but today, I’m going inside DSC to demonstrate DSC’s indempotance nature and also the Get, Set and Test functions. I’ll do this by walking through the Script DSC Resource.

Indempotent?

When I first heard about PowerShell DSC I was told it was idempotent. I joked well it can happen to anybody(boom-boom!). But then I actually looked up the term and discovered it meant “an operation that will produce the same results if executed once or multiple times”

In fact, if you run a DSC script it will TEST the configuration first. If the configuration evaluates as non compliant then it will SET the configuration. Running the script/configuration/resource again will do nothing further as the configuration will now evaluate as compliant.

Inside the DSC Resources.

This is a DSC Resource I wrote called STMS_cAuthoriseDhcpServer. It has 3 functions that are common in all DSC Resources. Get-TargetResourse, Set-TargetResourse and Test-TargetResourse.

image

These functions must all exist and have the names given above.

Example Configuration.

OK let’s look at todays script.

Configuration HelloWorld {
    Script Demo
    {
        GetScript = {
            $File = 'C:\ScriptimusExMachina\DSCHelloWorld.txt'
            $Content = 'Hello World!'
            $Results = @{}
            $Results['FileExists'] = Test-path $File
            $Results['ContentMatches'] = Select-String -Path $File -SimpleMatch $Content -Quiet

            $Results
        }
        SetScript = {
            'Hello World!' | Out-File C:\ScriptimusExMachina\DSCHelloWorld.txt
        }
        TestScript = {
            $File = 'C:\ScriptimusExMachina\DSCHelloWorld.txt'
            $Content = 'Hello World!'

            If ((Test-path $File) -and (Select-String -Path $File -SimpleMatch $Content -Quiet)) {
                Write-Verbose 'Both File and Content Match'
                $True
            }
            Else {
                Write-Verbose 'Either File and/or content do not match'
                $False
            }

        }
    }
}

It’s another Hello World DSC configuration that does exactly the same as yesterdays script, but this time, I’m using a built in resource called Script.

Just as I did yesterday, I paste the configuration into the console(for testing) and execute it to create my MOF file.

image_thumb5

Just as before, launching it creates a text file with the contents “Hello World!”

image_thumb7

The Script Resource

We can explore a DSC resource by using the Get-DSCResource cmdlet. The syntax parameter shows the actual code that we can use in our configuration. It is a common practice to just copy and paste the syntax into a code editor.

image

This resource will hold 3 script blocks. The Get, Set and Test code.

Get.

This code block returns a hashtable and is run only when you use the Get-DSCConfiguration cmdlet to view the values of the current state. It does not affect the execution of DSC in push or pull modes.

GetScript = {
    $File = 'C:\ScriptimusExMachina\DSCHelloWorld.txt'
    $Content = 'Hello World!'
    $Results = @{}
    $Results['FileExists'] = Test-path $File
    $Results['ContentMatches'] = Select-String -Path $File -SimpleMatch $Content -Quiet

    $Results
}

 Set.

This code block applies the configuration when DSC is executed. It contains the code required to return the configuration to the desired state. Within this section you can call functions or any available cmdlets needed.

SetScript = {
    'Hello World!' | Out-File C:\ScriptimusExMachina\DSCHelloWorld.txt
}

Test.

This code block evaluates the configuration and returns a Boolean value of either True or False. It is executed when either Start-DSCConfiguration Test-DSCConfiguration are launched. During a DSC configuration process, this function is run first and if it evaluates as true then the Set is launched immediately.

TestScript = {
    $File = 'C:\ScriptimusExMachina\DSCHelloWorld.txt'
    $Content = 'Hello World!'

    If ((Test-path $File) -and (Select-String -Path $File -SimpleMatch $Content -Quiet)) {
        Write-Verbose 'Both File and Content Match'
        $True
    }
    Else {
        Write-Verbose 'Either File and/or content do not match'
        $False
    }

}

Summary

The power of DSC is in these 3 little functions. They represent good standards that could be applied to any kind of infrastructure scripts.

Posted in Deployment, Desired State Configuration, DSC, PowerShell, Scripting | Tagged , | Leave a comment

PowerShell: Desired State Configuration – Getting started.

image

By now most people will have heard about the Windows PowerShell Desired State Configuration(DSC), the incredibly powerful configuration management platform that comes with PowerShell 4.0. This post will describe the feature in its most basic form and assume you’re new to the topic(or have been living under a rock). This should give you an overview and basic understanding of how PowerShell DSC fundamentally works. From then, I’ll post further and share how I’ve been using DSC to control my Lab environments.

What’s it all about then?

DSC is a management platform in Windows PowerShell that essentially just runs PowerShell scripts in a very clever manner, allowing you to push a configuration to a computer. You can do pretty much anything in PowerShell and as DSC runs on top of PowerShell you have even more power with DSC. Also, the amazing thing is you don’t even need to learn scripting to use it, you just edit a text file.

PowerShell DSC is really cool and the next big thing in the world of deployment. Moving forward I can see DSC replacing (or augmenting) Group Policy, building local and cloud based servers/hydration kits, removing malware/deploying software, etc.

Today’s post will demonstrate how to use PowerShell DSC in ‘Push’ mode by authoring a DSC Configuration using ‘Declarative Syntax’ to create a text file with the words “Hello World” and then ensure that the file and its content will remain compliant.

The same basic process will be used in further posts to build an entire server and domain PoC testlab. The power of PowerShell Desired State Configuration(DSC) is practically limitless.

So is there a script coming any time soon?

Indeed! Enough talk, here’s the Hello World Script. It’s written in DSC declarative syntax and uses a DSC Resource called File to create a text file.

configuration HelloWorld {
 param ()
 Node Localhost 
 {
   # Create a Test File
   File CreateTestFile
   {
     Ensure          = "Present"
     DestinationPath = "C:\ScriptimusExMachina\example.txt"
     Contents        = "Hello World."
     Type            = "File"
   }
 }
}

# Create MOF Files
HelloWorld -OutputPath C:\ScriptimusExMachina\HelloWorld

# Start DSC Configuration
Start-DscConfiguration -Path C:\ScriptimusExMachina\HelloWorld -ComputerName Localhost -Verbose -Wait

I still don’t get it?

What we’re trying to do here is generate a folder that contains a configuration file in MOF format.

Erm , I’m still not getting it. This MOFF fellow, is this the guy Darth Vader choked or the old guy played by Peter Cushing?

Grand Moff Tarkin. (Not to be confused with a MOF file in PowerShell DSC)

Erm, neither. A MOF is just a text file in Managed Object Format (MOF). We’re going to use this MOF file to apply a configuration to our host computer. We don’t actually need to learn how to write a complex MOF file. We’re going to use the Configuration in the script above to create the MOF file for us.

For demo purposes we paste the Configuration into the console.

image

The Configuration works like a Function and has 3 parameters InstanceName, OutputPath and ConfigurationData. Ed Wilson (The Scripting Guy) does a great job of describing these here.

image

We now run our HelloWorld Configuration in its simplest form.

HelloWorld -OutputPath C:\ScriptimusExMachina\HelloWorld

image

As you can see, it creates a folder with the same name as our Configuration with a .MOF file inside. The MOF filename is the same as the target hostname specified in the Hello world configuration earlier. If you had multiple hostnames in your configuration then you would have one for each host.

image

What this means is that when the configuration is applied, each MOF (one for each machine) file will be applied. In this case however, we’re just using Localhost.

Just do it already!

We use this command to start the DSC configuration.

Start-DscConfiguration -Path C:\ScriptimusExMachina\HelloWorld -ComputerName Localhost -Verbose -Wait

The Configuration is applied using the Start-DscConfiguration cmdlet, pointing it to the folder path of our MOF files. If you had multiple hosts configured then you could just apply one by name by using the ComputerName parameter as shown in the example. Using the Verbose and Wait Parameters causes DSC to output its data in real time as shown below.

image

Walking through the syntax used in the script earlier. First we ensure that our configuration is present. We could use Absent to delete a file or folder.

Ensure          = "Present"

We specify the name and path of the file that we’re going to create. The type could also be a folder instead.

DestinationPath = "C:\ScriptimusExMachina\example.txt"
Type            = "File"

Here we ensure that its contents are a specific string.

Contents        = "Hello World."

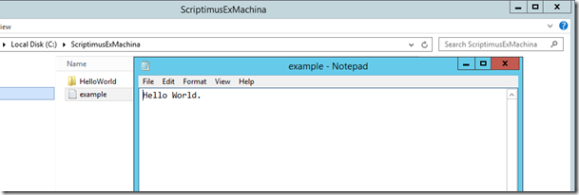
Looking in the folder, we have a new text file with the desired content.
image

Now that’s PowerShell DSC in its simplest form.

We can test that our Configuration is compliant using the Test-DSCConfiguration CmdLet. This will return a Boolean response.

image

Watch what happens when I change the content of the file.

image

Now I can use Restore-DscConfiguration to re-apply the configuration.

Restore-DSCConfiguration

This is made possible because the MOF file that was applied last has been copied to C:\Windows\System32\Configuration\Current.mof. You could use Restore-DscConfiguration to re-apply the configuration without the source.Configuration

By using the source I could also re-apply the configuration by using the Start-DscConfiguration cmdlet again.

image

You’ll see that this time, by not using the Verbose and Wait Parameters that DSC is showing me that the process is running as background Job.

You can retrieve the job as usual.

image

Finally, you can use the Get-DscConfiguration cmdlet to view the current configuration.

image

In future posts I’ll be discussing more complex configurations so keep reading.
Posted in Desired State Configuration, PowerShell | Tagged , | 2 Comments

PowerShell: New-Password Function

Scriptimus PowerShell Banner

OK, so I’ve been off the grid for a while now. But that doesn’t mean I’ve not been busy. Quite the opposite in fact. I’ve taken a year out from work on paternity with my baby Son. During this time, I did a lot of training in my lab developing new skills and solidifying other more fundamental skills. I’ve also passed a couple of certified exams and have built a new lab from a new HP Micro-server that I juiced up. I’m currently planning to take the MCSA: Server 2012 R2 exam and have been training in my lab and doing a lot of PowerShell DSC based automation. Hopefully I’ll be able to share some if not all of this knowledge and experience soon. I thought it best to return with a simple post so here goes.

During my time off I wrote a simple function to generate a password from random characters. I posted it yesterday here in the Microsoft Script Center Script Repository . Here’s a quick screenshot demo:

Demo

And here’s a simplified version for discussion.

Function New-Password {

    Param(

        [int]$length=30,

        [alias("U")]
        [Switch]$Uppercase,

        [alias("L")]
        [Switch]$LowerCase,

        [alias("N")]
        [Switch]$Numeric,

        [alias("S")]
        [Switch]$Symbolic

    )

        If ($Uppercase) {$CharPool += ([char[]](65..90))}
        If ($LowerCase) {$CharPool += ([char[]](97..122))}
        If ($Numeric) {$CharPool += ([char[]](48..57))}
        If ($Symbolic) {$CharPool += ([char[]](33..47))
                       $CharPool += ([char[]](33..47))}

        If ($CharPool -eq $null) {
            Throw 'You must select at least one of the parameters "Uppercase" "LowerCase" "Numeric" or "Symbolic"'
        }

        (Get-Random -InputObject $CharPool -Count $length) -join ''

}

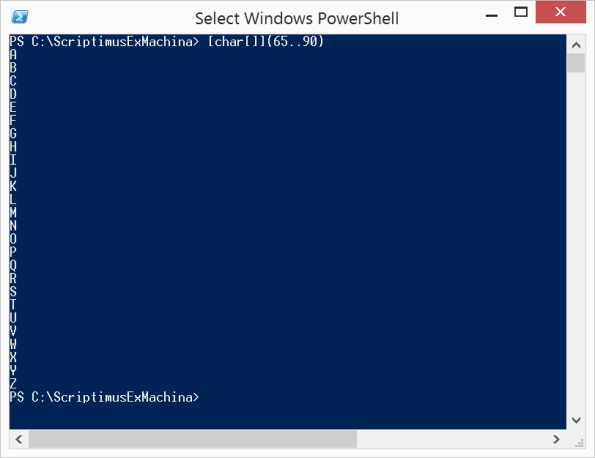
The only issue with this was working out each of the character types. Fortunately I learned, through testing, that you could return a series of ASCII characters by indexing them.

[char[]](65..90)

PowerShell Characters

For example, this line of code places the lowercase characters a-z in a variable (really a string type object) called $L.

$L = ([char[]](97..122))

PowerShell Characters LowerCase

Here you add 92 characters in turn to a string object called $CharPool.

$CharPool += ([char[]](65..90))
$CharPool += ([char[]](97..122))
$CharPool += ([char[]](48..57))
$CharPool += ([char[]](33..47))

Yes, I really counted them!

PowerShell Count Characters

Next, I needed to work out how to get a number of random characters from the pool so I used the Get-Random cmdlet.

$CharPool = ([char[]](97..122))
Get-Random -InputObject $CharPool -Count 5

The problem with this though is that each of the characters are on a new line.

Get-Random

Then I remembered the -Join operator.

(Get-Random -InputObject $CharPool -Count 5) -join ''

PowerShell Get-Random Join

Enjoy.

Posted in PowerShell | Tagged , , | 10 Comments

SCCM PowerShell: Connect to SCCM Function


Today’s post is another time-saver function I wrote to connect to SCCM. Again, it is designed to eliminate the need to hard code the module path and/or the SCCM primary site. It allows me to just type Connect-SCCM to import the module then enter to the SCCM PSdrive.

Like my MDT function this one locates the install path from the registry to help discover the module location. It will then detect the SCCM PS drive automagically and set the location to it.

I’ve uploaded it to the Technet script repository here and again below is the simplified version.

Function Connect-SCCM { 

    If (!(Get-Module ConfigurationManager)) { 

        [String]$SCCMInstall = ((Get-ItemProperty 'HKLM:\SOFTWARE\Microsoft\ConfigMgr10\Setup').'UI Installation Directory') 

            Import-Module ($SCCMInstall +'bin\ConfigurationManager.psd1') -Scope Global 

    }         

    Set-Location ((get-psdrive -PSProvider CMSite).Name+":") 

}
Posted in MDT 2010, MDT 2012, MDT 2013, PowerShell | Tagged , , | 2 Comments